Friday, July 30, 2010

Parmesan Crispy Chicken

One of the best parts of having this blog is knowing exactly where to look to find all of my favorite recipes.  I literally bring up my own posts and follow along.  I don't know how people survive without their own food blog, honestly.

Since getting a Big Girl camera, it's painful to look at the pictures from my blog's early days.  Now that I added the "You might also like" feature to the bottom of my posts, I cringe when I see a particularly blurry and yellow mess from the days of yore.

One recipe I make over and over again is a parmesan, mustard, and panko-crusted chicken.  Formerly known as "Oven Crispy Chicken" on the blog, I'm renaming it to celebrate the new pictures.  The old post will now be deleted into the ether, so now I can make this recipe with a new piece of mind.

Parmesan for a rich salty flavor and panko bread crumbs for a light and crispy texture.  On it!

In a shallow dish, place 1 cup panko breadcrumbs, 1/2 cup parmesan, 1 tablespoon thyme, 1 tablespoon olive oil, kosher salt, and pepper. Mix together until combined. 

This creates the outer, crunchy bite on the chicken.

In another shallow dish, place 1/8 cup spicy or dijon mustard, 1 tablespoon water, 1 tablespoon olive oil, kosher salt, and pepper. 

I like to use my Pyrex pie dishes for the shallow bowls, but that's just me.  

Now for the chicken.  Pound your boneless, skinless chicken breasts with a mallet or rolling pin until they are about a 1/4 inch thick.  To be honest, I rarely get mine quite that thin.  Make sure to pound the chicken in between wax paper, plastic wrap, or parchment paper so as to avoid too much chicken gunk getting all over the place.

Coat the chicken with the mustard mixture and then cover the the breadcrumb mixture.  Don't worry about getting too much of the mustard mixture on the chicken - I promise it won't give an overly mustard flavor to the chicken.

Place the chicken on a baking sheet lined with aluminum foil and either a grilling rack or a cooling rack.  This way your chicken will be crispy on all sides.


Bake for about 30 minutes in a 400 degree oven. Switch on the broiler for the last 10 minutes or so in order to get a nicely browned top crust.

This super simple recipe is one of John's favorites.  He constantly requests it, and I more than happily oblige.  Easy, delicious, and made with things I always have around anyway!  Doesn't get any better!  Now that I have more appetizing pictures, I hope to convince a few more readers to make this into a staple in their houses.

Oven Crispy Chicken
Adapted from Ms. Deen


1 cup panko breadcrumbs
1/2 cup grated Parmesan
2 tablespoons olive oil, divided
1 tablespoon thyme
Kosher salt
Freshly ground pepper
1/8 cup spicy or dijon mustard
1 tablespoon water
2 chicken breasts, pounded until 1/4 of an inch thick

Preheat oven to 400 degrees. Line a baking sheet with aluminum foil and place a grilling rack or cooling rack on top.

In a shallow dish, combined 1 cup panko breadcrumbs, 1/2 cup grated Parmesan, 1 tablespoon olive oil, 1 tablespoon thyme, kosher salt, and freshly ground pepper. In another shallow dish, combine 1/8 cup spicy mustard, 1 tablespoon water, 1 tablespoon olive oil, salt, and pepper. Coat each chicken breast with mustard sauce and dredge in breadcrumb mixture. Place chicken breasts on rack on baking sheet. Bake in 400 degree oven for about 30 minutes. For the last 10 minutes, turn on the broiler in order to achieve a browned top for the chicken. Serve immediately and enjoy!

Happy Blogiversary!


Happy one-year anniversary, little bloggie of mine!  Time flies when you spend your life on the internet.

Thanks for reading, everyone!  All three of you...

Thursday, July 29, 2010

While the Cat's Away

While the cat's away...the mouse will be very lonely.

John left on Sunday for two weeks and this mouse has not exactly been reveling in any new found freedom.  To combat my loneliness I put pictures of John up in the places I would see them the most.  One is next to the TV of course - what else does one do when they are alone?  (30 Rock DVDs anyone?)

John always makes fun of me for taking such a long time to get ready at night, so I thought I should accompany my long tooth brushing sessions with a picture at his sink.

One last picture on the nightstand.  On his side of course (hence the overly wrinkled pillow cases).

So for the next two weeks, it's just me, Maddie, and some picture frames.  I better find some intensive recipes to make to keep me occupied.

Wednesday, July 28, 2010

Orange Julius

Is it just me, or was Teen Living (aka Home Ec) a little too early in your life?  If you go to college and perhaps follow college with a heavy dose of grad school, then there is a good chance you won't be sewing or baking until long after your teenage years are done.  Should I write to UVA Law and suggest they start offering Old Lady Living classes?

There are very few things I remember cooking in Teen Living.  I remember puppy chow (anyone with me on that) and omelets (which I did not get a good grade on, by the way).  And I very distinctly remember making orange juliuses.  I think I even "taught" my mom how to make them after we learned how in class.  I'm sure she was thrilled to learn that you add orange juice concentrate to milk and ice to make a frothy drink.

I had some extra homemade vanilla ice cream and orange juice from the farmers market, which I thought would make for a delicious orange julius.  I started Googling recipes and was shocked to be reminded this tasty drink is made from milk (not ice cream) and OJ concentrate (not juice).  I had almost given up on the concept until the lovely Elizabeth emailed me her favorite orange julius recipe that her best friend's mom made for them on the mornings after a sleepover.  I had a hunch this recipe would be exactly what I was looking for, and it was.

The OJ concentrate factor makes a lot more sense when I realized you add ice to make the drink cold and slushie, so if you were using regular juice it might taste watered down.  I used whole milk, though Elizabeth says skim or 2% works just fine.

It's hard for me to say what the serving size of this recipe is.  It makes about half a blender-full, which for me, was enough for several glasses, and I made it my lunch.  I don't really expect other people to be as crazy as I am, so I would imagine this would make 4 medium-sized servings.  But if you want to eat it for a meal, don't look at me to stop you!

Orange Julius
Courtesy of Elizabeth

6 oz. orange juice concentrate (which was half of a 12 oz. can for me)
1 cup milk
1 cup water
1/4-1/2 cup sugar (depending on your sweet tooth)
1 teaspoon vanilla
10-12 ice cubes (depending on the size your fridge makes)

Add all of the ingredients to a blender and blend for 30-45 seconds until the ice is completely crushed.  The drink should be frothy and smooth.  Serve immediately.  Makes 1-4 servings depending on your thirst.

Tuesday, July 27, 2010

Winning Teak

When you have a small two-door car, your furniture buying options are pretty limited.  John and I talked about getting some teak outdoor furniture for a year, but because we didn't want doll house sized chair,s we waited until we finally got our SUV.

Luckily we got the bigger car just in time for summer.

Two chairs and a tiny table are all we can fit on our balcony, but that's all we need.  Maddie would prefer we didn't take up so much space on "her" balcony with our silly human sitting objects, but that's her problem.   

There's nothing like sitting outside drinking a cold glass of watermelon lemonade.  And yes, we are using coasters on our outdoor furniture.  Speak to John about this, please.  

Sunday, July 25, 2010

Corn Chowder

I've been accused of being hyperbolic, so I don't want to say it's tragic that corn is only available in the hot summer, but c'mon people, it is tragic.  How else are we supposed to enjoy corn chowder to the fullest?

I made this recipe right when corn started showing up at the markets in California on a Sunday that was a blessedly cool 70 degrees.  Today was a similar Sunday, but I didn't make any chowder since I had plenty of leftover Chicken Tikka Masala in the fridge.

I've never been a chowder kind of gal, but this soup is absolutely incredible.  The cream gives it a thick richness, the potatoes give it texture and body, and the corn gives it the perfect sweetness.  It may be lacking umami, but it's got everything else.

Here are your main non-corn ingredients.  Garlic.  Some Yukon golds.  An onion.  And a bunch of thyme (of which you only need 4 sprigs or so).

Start by chopping up one large onion.  It's amazing how many recipes start out this way.

Meanwhile, in a large dutch oven melt 2 tablespoons of butter over medium heat.  Add in one tablespoon of olive oil and heat until warmed.

Add in the chopped onion and cook for 7 minutes.  Then add in 4 cloves of minced garlic and the leaves of 4 stems of thyme and cook for another minute or two.

Stir in 1/4 cup for flour and cook for an additional minute.

Pour in 4 cups of vegetable or chicken stock (I used chicken because that's the only stock I keep on hand - veggie schmeggie).  Bring to a boil.  Stir in 2 cups of cream and 2 dicked Yukon potatoes.  Bring to a boil and let it keep boiling for 7 minutes or so.  At this point the potatoes should be pretty well cooked.

While you're waiting for all the boiling to take place, this is a good time to shuck your 5 ears of corn.  When you shuck the ears, break off the stem if you can.  To remove the kernels, place the flat end of the corn in a large bowl and use a sharp knife to scrape the kernels into the bowl.

After the 7 minute boil, add in the corn kernels and cook for 10-12 minutes.  Stir in plenty of kosher salt and freshly ground pepper.  Meanwhile, cook 4 slices of bacon in a 400 degree oven for 10-12 minutes, until crispy.  Remove the bacon to a paper towel to drain.  Slice the bacon into small strips.

Use a hand/immersion blender to blend until smooth.  This isn't a required step, but I like my soups creamy and without lumps (other than the bacon).  You could also use a regular blender for this process, but you must allow the mixture to cool a bit before blending and you would have to work in shifts.

Add one last drizzle of olive oil to the soup before serving.

One night I used grated cheese and bacon to top this soup.  I'm crazy like that.  John and I were licking our bowls after eating this two nights in a row.  It is that good.  I have a stash stored away in the freezer too - perhaps I'll save it for when the weather actually is cold.  I don't think I'll be able to wait that long though.

Corn Chowder
Adapted from Tyler Florence

2 tablespoons butter
1 tablespoon olive oil
1 onion, diced
4 garlic cloves, minced or pressed
Leaves of 4 sprigs of fresh thyme
1/4 cup flour
4 cups chicken or vegetable stock
2 cups heavy cream
2 large Yukon gold potatoes, peeled and diced
Kernels of 5 ears of corn
Kosher salt
Freshly ground pepper
4 slices of bacon for garnish

In a large dutch oven heat 2 tablespoons of butter and 1 tablespoon of olive oil over medium heat.  Once hot, add in 1 diced onion.  Just before the onion is almost done cooking (about 7 minutes in), add in 4 cloves of minced garlic and the leaves of 4 sprigs of fresh thyme.  Cook another two minutes until everything has softened.  Add in 1/4 cup flour and toss to coat, cooking another minute.  Pour in 4 cups of chicken or vegetable stock and bring to a boil.  Pour in 2 cups of heavy cream and 2 peeled and diced Yukon potatoes. Bring to a hard boil and cook for 7 minutes until the potatoes are fully cooked and breaking down.  Add the kernels in from 5 ears of corn.  Season with lots of kosher salt and freshly ground pepper.  Cook for 10-12 minutes, until the corn is softened.  Meanwhile, cook 4 slices of bacon in the oven on a baking sheet at 400 degrees for 10-12 minutes - until crispy.  Remove to a paper towel to drain.   Use a hand/immersion blender and blend in the pot until the soup is smooth.  Chop the bacon into small slices.  Splash a small drizzle of olive oil into the soup and stir.  Serve the soup with a garnish of bacon (and shredded cheese if you're wild) on top.

Friday, July 23, 2010

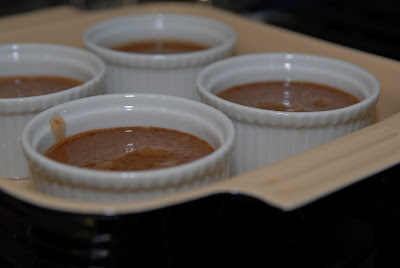
Chocolate Pot De Creme

I've never really been a creamy dessert person.  Anything remotely like flan sends me immediately to the next item on the dessert menu.  No thank you.  Maybe I'll eat a moose and obviously I like ice cream (which I consider something different entirely), but custards are not my thing.

So picture this.  John and I enjoyed a remarkable dinner at Zuni Cafe and...what does a good dinner beg for if not a good dessert?  So we scan the dessert menu and John lays his eyes on the chocolate pot de creme.  This doesn't surprise me because the keyword, "chocolate" was in the title, already selling this dessert to my husband.  I shrug (which my mom tells me is almost my signature move) and don't expect much.  While we are waiting for dessert I spot a young couple across the room snapping pictures on their iPhones of their entrees.  I probably would do that for you guys if food didn't look so disgusting when photographed in low light on a phone.  Eventually the chocolate pot de creme arrives with the requisite chocolate smear on the plate and rich whipped cream.  I pick up my spoon, take my first bite, and my eyes widen.  I look up at John and his face reflects the look plastered across my face: "ohmygod!"  We pretend to play it cool and alternate bites, but both of us secretly plots a way to get as much of this dessert into our bellies. 

There was a couple with us that night, too.  We didn't offer them a taste.

Since that pot de creme night, I started poking around ye olde internet for a chocolate pot de creme recipe.  The first place I looked with David Lebovitz's blog, but he cruelly didn't have a recipe posted.  Luckily for me, I had his book Ready for Dessert out from the library, and it had a winning recipe enclosed.  Two of my other library books had pot de creme recipes, but I decided I'd trust the Parisian.  It was a good decision.

This recipe would be perfect for a dinner party.  It is served at room temperature, looks fancy, and will knock your taste buds off. 

As always, use good ingredients (or even better yet, great ingredients) because this is a simple recipe.  I found that the uber-rich chocolate flavor needed something to cut it, and since I didn't have any whipped cream or ice cream, I topped it with raspberries.  For someone who loves the chocolate-raspberry combination, this was perfect.  I suggest you use something to complement the chocolate flavor to make this dessert even better.

So there ends the story of a big city restaurant inspiring me to make something at home.  If we lived in San Fran we would be able to go to Zuni more often, but as it is, I'll settle for homemade in the meantime.  We have less fog here anyway.

Chocolate Pot de Creme
Adapted from Ready for Dessert by David Lebovitz

Makes 4 servings in 2-inch ramekins

3.5 oz (100 g) bittersweet or semisweet chocolate, chopped
1 cup half-and-half
2 tablespoons sugar
1/2 teaspoon instant espresso or coffee powder (optional)
Pinch of salt
3 large egg yolks
1/2 teaspoon vanilla extract

Place four 2-inch ramekins in a roasting pan.  Chop 3.5 oz. of semisweet or bittersweet chocolate and place in a large bowl.  In a medium saucepan, heat 1 cup half-and-half, 2 tablespoons sugar, 1/3 teaspoon instant espresso and a pinch of salt until very hot.  Stir to dissolve the sugar completely.  Pour the hot mixture over the chopped chocolate and whisk until the chocolate is melted.  If you see any specks or chunks, continue to whisk (it will eventually melt).  Let the mixture cool until tepid.  Meanwhile, preheat your oven to 350 degrees.  When the chocolate mixture has cooled sufficiently, whisk in 3 large egg yolks and 1/2 teaspoon vanilla extract.  Pour the custard into a measuring cup and divide evenly among the four ramekins.  Pour enough warm water into the roasting pan to go halfway up the sides of the ramekins.  Cover the pan tightly with foil and bake for about 30 minutes, until the sides have just set and the center is still slightly jiggly.  Remove the ramekins from the hot water and allow to cool on a wire rack.  Serve slightly warm or at room temperature, ideally with whipped cream, ice cream, or raspberries.

Thursday, July 22, 2010

Cherry Crisp

I probably know only three words to the song "Sweet Cherry Pie."  And you just read 'em.  As a kid I probably would have scrunched up my nose and told you I didn't like cherry pie, but that's because I'd only encountered the kind that came out of a can.  Since I've become cherry obsessed, I started fantasizing about making my own cherry pie.  The more I thought about it, the more I wanted to eat it, but the less I wanted to make it.  It dawned on me that I should make a cherry crisp instead because a) crisps are about 10% of the work and b) crisps often taste twice as good (whoa that was too much math for one day).  Now the problem is that since I've figured out how to make cherry crisp, I'll never know how good my own cherry pie would be...since I"ll never need to make it.

I scoured the internet for a good cherry crisp recipe, but surprisingly this concept is not very popular.  And the recipe in Joy of Cooking called for the dreaded canned cherry pie filling.  The horrors.  I developed my own recipe and I hope you like it as much as I do (well, did, it's long gone now).

The only real effort required is pitting 2 pounds of fresh sweet cherries.  Pitting cherries is no laughing matter - it took me 30 minutes even when a fancy cherry pitter. 

Pitted cherries resembled olives (which I detest).  They taste a tad sweeter, though. 

After you have pitted your cherries, mix them with 1/8-1/4 cup sugar (depending on the sweetness of your cherries), 2 tablespoons tapioca starch, the juice and zest of half a lemon, and a pinch of salt.  

I found that it helped to remove many of the stems at once and then go through and pit the cherries.  That way you could focus on the violent pitting instead of destemming as well.

If you've never pitted cherries, don't do so for the first time in a white shirt, or any shirt other than a red one.  It's a messy business and requires an apron.  Anything sitting nearby will also look disturbingly like you did some butchering that afternoon.

Because I was taking these crisps to-go (to Nitch's house), I decided to use my Le Creuset cocottes.  Also, they're just so darn cute.  You can use individual ramekins, which I recommend (it will make about six 1-cup sized desserts), or you can use a 9x9 pan.  Be sure to butter the containers first.

To make the crisp topping, add 3/4 cup brown sugar, 1/2 cup flour, 1/2 cup quick-cooking oats, a pinch of salt, and 1/3 cup of cold, diced butter to a large bowl.  Using two knives or a pastry cutter, get to work combining the ingredients.  Do not stop until the topping looks like coarse pebbles. If there is still some flour/sugar at the bottom keep at it.

Top the cherries with the crisp and bake at 375 degrees for 27-35 minutes, until the top is golden brown and the cherries begin to bubble.  Topping this with vanilla ice cream is a must.  I made some for the occasion, but any kind will do.  This is a very sweet dessert because you can't escape how sweet cherries are.  The salt and lemon helps balance the flavors, but it is still very sweet.  Consider yourself on notice.  Even so, this dessert makes fresh cherries taste even better and I highly recommend it if you ever find yourself too lazy to make a cherry pie. 

Warn your guests that there might be a few stray pits left in the dessert.  Somehow mine had three and everyone else was essentially spared.  Karma? 

Cherry Crisp

About 2 pounds of fresh, sweet cherries, pitted
1/8-1/4 cup sugar (depending on sweetness of cherries)
2 tablespoons tapioca
Zest of 1/2 lemon
Juice of 1/2 lemon
Pinch of salt

3/4 cup brown sugar, packed
1/2 cup flour
1/2 cup quick-cooking oats
1/3 cup butter, cold and diced
Pinch of salt

Pit about 2 pounds of fresh, sweet cherries while wearing an apron or red shirt.  To the pitted cherries, and 1/8-1/4 cup sugar, depending on how sweet your cherries are (mine were very sweet).  Mix in 2 tablespoons tapioca starch, a pinch of salt, and the zest and juice of 1/2 lemon.

To make the crisp topping, in a large bowl add 3/4 cup brown sugar, 1/2 cup flour, 1/2 cup quick-cooking oats, a pinch of salt, and 1/3 cup cold butter.  Using a pastry cutter or two knives, press the butter into the flour mixture until coarse pebbles form (keep at it until it happens).

Butter either individual ramekins (about six one-cup ramekins) or a small baking dish (perhaps about 9x9) and preheat the oven to 375 degrees.  Add the cherry mixture and then top with the crisp topping.  Bake at 375 for 27-35 minutes until golden brown on top.  Serve warm with ice cream.

The crisp topping and cherry mixture can be prepared in advance and stored in the fridge separately.

Wednesday, July 21, 2010

Meet Foodiebia


It's all about me...and that creepy man staring into the camera behind me.  I finally got around to posting a respectable "About" page entitled "Meet Foodiebia" on the top bar.  I was planning on using this photo of me as the first picture, until I realized the spectator in the background might scare people away (as he does me).

Tuesday, July 20, 2010

Cheddar Crackers

Part of the fun of being obsessed with food and cooking is making things that are borderline ridiculous.  Such as your own doughnuts, for instance.  Or perhaps frying up a batch of zucchini chips.  The other night when John was out of town I decided to make my own cheddar crackers and eat them for dinner.  I wasn't craving cheddar crackers, exactly, but I was dying to try the recipe.

Unfortunately, that same evening I decided I would also make my own cherry frozen yogurt (I have issues)...so after cooking for about 3 hours after work my cheddar crackers finished at roughly 10:00 PM.  I have a tendency to get a bit overly ambitious when I'm in the mood, and last Tuesday was no exception.  Luckily for me, the cheddar crackers hit the spot, and in fact, the spot was one of nostalgia that I hadn't thought of in ages.  Did anyone else get Better Cheddars (or perhaps Chez-its) tucked into their lunch boxes?  Well I did, and it was a wonderful treat to bite into the salty rounds with a hint of cheddar flavor.  These crackers are clearly loads better than anything you find in a red cardboard box, but they are cheddar crackers nonetheless, and reminded me of my lunch box days.  Whether you had a fondness for cheddar crackers growing up or not, I hope you try this recipe one day when you're feeling a bit overly ambitious and find it necessary to make your own crackers.

The crackers almost didn't come to existence that fateful night, though, because I was convinced I had messed up the recipe.  I almost called Natalie for advice, since she was the one who steered me toward these crispy crackers.  After I added all of the ingredients into the would-be dough, my stand mixer kept churning and churning and all I had was a bunch of walnut and cheese pebbles in my bowl.  Luckily, I figured there was no harm in letting the mixer keep at it for another few minutes (because it wasn't like it could ruin something that wasn't usable anyway), and much to my chagrin, normal dough formed soon enough.  So if you make this recipe and begin to doubt yourself, let your mixer do its thang and the dough will come together.

If I were a wine drinker, I would have accompanied my crackers with wine.  But alas, that's not my style, so I used a nice glass of cold milk to go with this cheesy snack.  What can I say?  I always liked my Better Cheddars with milk.

Cheddar Crackers
From Tartine by Elisabeth Prueitt and Chad Robertson

3/4 cup (105 g) flour
1 tsp salt
1/4 tsp cayenne pepper
1/2 tsp black pepper
2 1/3 cups (225 g) sharp cheddar cheese, grated
1/4 cup (55 g) unsalted butter, at room temperature
2/3 cup (70 g) chopped walnuts

Mix together flour, salt, cayenne pepper, and black pepper in a small bowl.  In a stand mixer fitted with a paddle attachment, mix the softened butter and shredded cheese until just combined.  Add in the flour mixture and beat on low speed until incorporated.  Scrape down the sides of the bowl.  Add in the walnuts and mix on low speed until the dough turns from pebbles into a stiff combined mixture.  Remove the dough from the bowl and place on parchment paper, wax paper, or plastic wrap.  Shape into a log about 1 inch in diameter and wrap well.  Freeze until hard, about two hours.  Preheat the oven to 400 degrees.  Cut the dough into 1/8 inch-thick slices and bake on parchment paper one inch apart for 8-10 minutes.  Make sure the crackers are browned before removing from the oven.  Allow crackers to cool on a wire rack and store in an airtight container for up to two weeks.

Sunday, July 18, 2010

Chocolate Inspiration


I'm not sure how much I've blogged about it, but I do my fair share of food-related reading.  Not only do I read cookbooks in bed, but I also devour food memoirs more than any other genre.  I've read every single Ruth Reichl book out there, as well as the other standards like Bourdain, Child, Powell, and Deen (namely, Anthony, Julia, Julie, and Paula).  I'm always on the lookout for new food memoirs to read, so if you have any suggestions please send them my way.  I'm up for food fiction as well, and I'm just finishing The Cookbook Collector (well, I will finish it tonight if I finish this post in time).

I've recently become a David Lebovitz devotee and I just finished his book, The Sweet Life In Paris.  On his blog and in this book he goes on at length about chocolate.  I couldn't be a more eager listener, for is there a better topic?  In an effort to further my chocolate education, John and I picked up three bars of gourmet chocolate from The Chocolate Garage in Palo Alto on Saturday morning.  The owner is a chocophile who loves to share her knowledge of the treat, and John and I loved hearing all about the bars we were buying.  Riding on my chocolate high, I picked up another four bars when I dropped by Whole Foods later that afternoon.  We're almost through with our first bar, a milk chocolate one by Madecasse Chocolate.  If you're going to snack on chocolate, it might as well be on the good stuff (as opposed to the chocolate chips I always find my way into), right?
Related Posts with Thumbnails